Infusionsoft Reporting with Google Sheets
Reporting inside of Infusionsoft is one of the single most complained about features. While the reports are mostly adequate, they simply are too limited and not easily customized. There is also no way to create nice visual charts or graphs and delivery of the reports to management can also be “challenging”. Until now…
Introducing, the Google Sheet It Helper for MyFusion Helper! In a hurry? Just watch the video here:
Google Sheets Comes to Infusionsoft
Our philosophy here at MyFusion Solutions is to INTEGRATE and not to reinvent the wheel. Case in point, we could have gone off on a mission to create a complete reporting module for Infusionsoft (others have). But our vision is one of “integration” instead. So we took a different path.
Google Sheets is a terrific reporting mechanism. Often called the “online version of Excel” for its ability to create eye-popping charts, graphs and richly formatted reports, it seemed like a logical fit to integrate with Infusionsoft. So that’s exactly what we did.
How it Works
It really is quite simple and you can have your first report up and running in five minutes. Here’s the simple four step process to follow:
- Create a saved search or saved report in Infusionsoft and give it a name.
- Using MyFusion Helper, create a simple Google Sheet It Helper that links the report to Google Sheets
- Copy/Paste the provided code from MyFusion Helper into Google Sheets
- (Optional) Set up Google Sheets trigger to automatically refresh the data on your desired cycle.
That’s it! Honestly, it takes less than 5 minutes to do. We’ve also made a video you can watch (above).
Try MyFusion Helper for Free
If you’re not currently using MyFusion Helper, simply go here to sign up for a free 30-day no obligation trial and see for yourself if it’s not the single most powerful integration suite available for Infusionsoft today. We have 34+ other integrations and helpers beyond Google Sheets that we know you’ll love.
Getting ClickFunnels Order Data Into Infusionsoft
Tell me if this sounds familiar…
You’re an Infusionsoft user frustrated by their ugly and restrictive order forms and lack of native Stripe.com integration.
So, you’ve ventured out and come across the best option you could find that would compliment Infusionsoft and replace the need for LeadPages, as well – Russell Brunson’s ClickFunnels!
Like many Infusionsoft users who are drawn in by the wizardry of Campaign Builder, you were likely drawn to ClickFunnels by the sexy and cool drag and drop page builder. Heck, who wouldn’t be? It IS very slick…
But…
As you started down the path of integrating ClickFunnels with Infusionsoft, you realized the path became pretty rugged. Right?
Well, I feel your pain. Like you, we use ClickFunnels in our various businesses, and do love the drag and drop builder, the easy upsells, the clean and simple checkout process and the integration with Stripe. So, yeah, we’re quite aware of one of the biggest challenges Infusionsoft users face with ClickFunnels:
How the heck do you get your order data back into Infusionsoft!?!?
I’m happy to say, we’ve figured it out for you. Let’s jump right in:
NOTE: This post is not meant to be an exhaustive list of all of the possible ways to integrate, as there are more than one, but rather a “Best Practices” approach to exactly what we do.
Step #1 – Setting Up the Order Form Properly
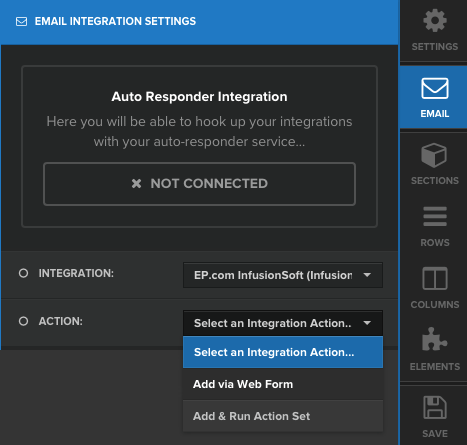 There are a couple of options here, but what we suggest and use is the web form integration. While it still doesn’t allow you to get all of the data you want, it is the easiest way to get MOST of the data you want.
If you look at the image on the left you’ll see that’s what we’re showing you. On your squeeze page AND on your order page you’ll want to integrate with Infusionsoft in this way – via the “Add via Web Form” method.
Notice that I said that you have to do this on both your squeeze page (if you’re using one) and your order form page. The goal here is to capture the customers order information – their address information and purchase data. So if you don’t put an integration on that order form page, you won’t have the ability to capture it. Seems simple, but the most common mistake I see is just having the email integration on the squeeze page and wondering why the data’s not getting into Infusionsoft.
For the squeeze page integration, just setup a simple web form with the fields needed – typically just first name and email. But for the order page integration we need to do things differently. Here we want to create a web form in Infusionsoft that has all of the billing detail fields – first name, last name, email, address, city, state, zip and phone number. When you setup this web form, don’t worry about making it pretty or anything, we’re just going to connect it into ClickFunnels.
THIS IS IMPORTANT – You must make ALL of the fields on the web form optional, yes, even the email field. Do not set any of the fields as being required as this can cause havoc with ClickFunnels. This recommendation, by the way, comes from both experience (meaning, we’ve seen the troubles ourselves) and from the support at ClickFunnels directly. This is their recommended configuration also.
So doing the steps above will ensure that you capture all of the billing information for the customer from the order form. Don’t worry that you’re using two web forms, you won’t be creating duplicate contacts in Infusionsoft as they will be using the same email address, so the first one will create the contact and the second one will update the contact with the additional billing information.
Unfortunately, this will not capture the actual products ordered or the price they sold for, etc… we’ll discuss that in the next section.
Step #2 – Configure Infusionsoft Sequence
Make sure to connect a sequence to your web forms in Infusionsoft and set any tags that you want. It’s also recommended that when you configure your web forms you setup a Lead Source for them. This is done by dragging a hidden field snippet onto your web form and connecting it to the Lead Source field of your choice. It’s essentially “hard coding” a Lead Source to the web form, so if you’re sending traffic from multiple sources, you would want to have multiple web forms in order to track the Lead Sources properly.
Let’s assume that you’re driving traffic from both your email list and Facebook paid ads, for example. In this case, you’d want two separate Lead Sources paired with two separate web forms and connected to two separate squeeze pages in ClickFunnels. While this seems like a lot of work, it’s actually quite simple since it’s mostly just copy and paste.
The reason Lead Sources are so important is a bit beyond the scope of this article, but it is how you track ROI in Infusionsoft. You can assign expenses directly to Lead Sources simply and easily in Infusionsoft. So, for example, you could add your weekly Facebook ad spend into the expenses for the Facebook PPC Lead Source. Now, you have push button ROI reports by Lead Source or by Lead Source category that will tell you how many impressions you’re getting, how many leads, how many customers and how much those customers and leads are costing you. This is all built into Infusionsoft, though less than 5% of the clients apps that I’ve audited actually use it. Don’t make that mistake.
Step #3 – Getting The Order Data
There are other ways of doing this, but they all involve other limitations like using old legacy action sets that leave you with orders that are unpaid and other untidy solutions. So remember, this is about what we do as a best practice in our businesses.
The option that we use, is to use the API or an app to handle this for you. We used to do it via the API directly, and that’s a good thing, because that means we already went thru that painful experience and you don’t have to! Now we’ve simply added the feature into our app MyFusion Helper as the Order It Helper. It allows you to create the order, specify the product, override the price, the order title and then, optionally, mark it as paid as well. We recommend setting up a dedicated custom payment type for this. For example, we have a “Paid by ClickFunnels / Stripe” payment type that we associate with these payments.
Note that these are “manual payments” as far as Infusionsoft is concerned, so you don’t have to worry about any credit card being charged and double-charging them (since they already paid via Stripe). This is simply recording the purchase into Infusionsoft so that your CRM is up to date.
One other nice feature of the Order It Helper is that it also allows you to fire off a custom purchase goal inside of Campaign Builder. This way you can have your standard fulfillment campaign sequence in place that is automatically triggered by a purchase from outside of Infusionsoft – pretty darn slick. If you’d like to see it in action,
So doing this you now have:
- Realtime leads added into your Infusionsoft CRM
- Realtime buyers and their address information added into your Infusionsoft CRM
- Orders and Payments recorded inside of Infusionsoft so you have that purchase history for your contacts
- Realtime purchase goals being triggered so you can kick off robust automation sequences and followup inside of Infusionsoft